CREATING ACCESSIBLE WORD DOCUMENTS
This is an overview for creating accessible documents using Microsoft Word 2016. Accessible documents allow information to be readily available for assistive technology. Screen readers can easily navigate the content when accessibility is considered during the design process. This will not only benefit people with disabilities, but overall usability will improve for all users. This information will cover headings, styles/formatting, images, tables, links, color contrast, columns, using the accessibility checkers, and converting the file to a PDF.
Headings
Headings are styles to give a document structure by category or topic. Headings are used to build sections within a document to create a visual hierarchy structure to show topics and sub-topics. A screen reader or viewer can easily find information based on headings. For example, if you were only looking for creating accessible tables on this page, you can skim (visually and technically) this page to find the sub-topic quickly. This improves usability, efficiency, and accessibility. Additional benefits to using headers include:
- Headings copy/paste seamlessly into a web content editor to minimize additional editing
- Headings are recognized when scrolling through a document
- Headings automatically populate a table of contents page
- Headings copy over to converted PDF’s
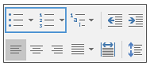
Heading styles options are located on the Home tab. Click the desired heading and begin typing. Highlighting a word and selecting the heading styling will change the heading. Selecting heading style should replace manually selecting fonts and sizing.

The document formatting can be customized. Click Design and select the desired formatting from the options.

An Example of Headings:
Styles/Formatting
Styling on a document can increase the impact or effect for the viewer. For example, bold or italic place a level of emphasis on a word. However, these styling elements are not recognizable to screen readers or to people with low vision. Select Strong from the styles toolbar instead of bold.

Organizing information on a document using bullets or numbered lists presents content in an organized manner and is recognizable to assistive technology. For example, when numbered lists are used screen readers will automatically detect the sequence and announce, “Number 1…” Be sure to use numbered lists for sequential ordered content and bullets to present summarized/brief content.
Images
Images can be inaccessible for people with low vision, color blindness, or who are Blind. To provide equal access to information presented in visual formats, a detailed written description of the image is required. Completed one of the following to provide descriptions for images:
- Providing a written description below the image (in the document)
- Inserting a caption by Right-Clicking the image and select Insert Caption, or
- Inserting an alternative text by Right-Clicking the image, select Format Picture, and click Layout & Properties (third icon). Be sure to type the explanation of the image in the description field, not the title field.
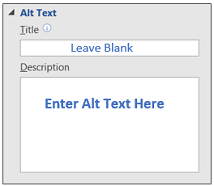
A written description, captions, or alternative (alt) text provides a written description of the image for screen readers. Consider the best description option for the image and document.
Additional Considerations
- When inserting the image, be sure to use the picture inline option to optimize reading order for screen readers
- Alternative text is extremely critical for images used for instructional purposes. For assessment statements such as, “Use the graph to answer questions 1-3” an alternative text is required for the graph.
- Complex (Math and Scientific) graphs and charts may require a caption (for larger amounts of information) to write a detailed descriptions
- Decorative images, such as line dividers, do not require a written description or alt text
Best Practices
- Be clear and specific
- Use phrasing to include inferred information
- If the image is for instructional purposes, be sure to include necessary information to answer questions
Tables
Tables are used to visually organize cross-referencing information. However, sometimes tables are used to organize the layout of the page or as a text box. Screen readers cannot decipher this type of content within tables and should be avoided. Use tables to organize structured information:

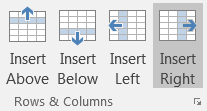
Once a table is created, continue to build rows and columns using the insert options on the toolbar rather than using the tab key.
Links
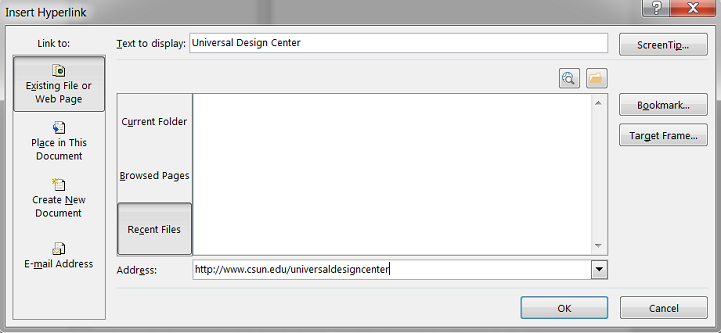
Links can help redirect a viewer to related content. Links should be clear and directly relate to the title or heading of the linked page. Links with vague wording such as, “Click here for more details” or “Go here for more information” can be misleading for screen readers and keyboard users. Instead, use direct wording such as, “Visit the Design Center for more information about accessibility."
Color Contrast
Color can play a significant role in the overall readability of a document. First, use of neon or pastel colors makes content challenging to read with someone who has low vision and/or a degree of color blindness. Additionally, the viewer will be placing a constant strain on the eyes to read the content. Secondly, if colors are used to place importance on instructional materials i.e. which section is highlighted in red, captions or alternative text should be included to note the significance of the colors. Some examples of good color contrast include:
White text on a dark background or Dark text on a light background.
Columns
Using columns can visually organize and condense information on a page. Screen readers have the ability to read content organized in columns. To create columns, select the desired text, click Layout, select Columns, and finally pick the number of desired columns.
Accessibility Checker
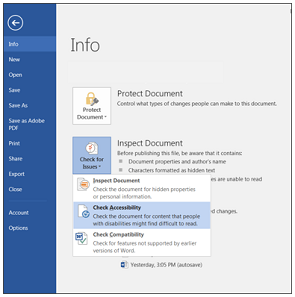
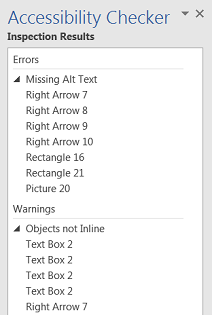
The Word Accessibility Checker scans the document for any potential errors or warnings and provides helpful tips to remedy the issues. The Accessibility Checker scan is helpful to identify inaccessible documents while they are being developed. To remediate an inaccessible document can cost between $8 - $30 per page and roughly $60/hour to complete. Using the Accessibility Checker is a cost effective step to creating accessible documents. When all editing is complete, scan the document. Click File, then Check for Issues and select the Check Accessibility from the drop-down menu. The Accessibility Checker results can be categorized by the impact on the viewer:
- Errors: this content will be very difficult or inaccessible to people with disabilities to view
- Example: missing alt text
- Warnings: this content, in most cases, will be difficult for people with disabilities to view
- Example: objects not inline
- Tips: this content is available to people with disabilities, however better organization is suggested
- Example: skipping headings from H1 to H3
When the scan is complete, the results will display on the screen. Click on each error and the document will jump to indicate exactly where the error on the page is occurring. Complete any missing alternative texts, misalignments, headings etc. All errors should be resolved before proceeding.
Converting a file to PDF
Converting a Word document to a PDF allows is a common best practice when preparing accessible documents. However, other benefits to this final step include:
- The content is a read-only format
- Portable and responsive on most devices
- Maintains any links, graphics, attachments and tables
- Allows viewer to read content without purchasing Microsoft applications
Click the Acrobat plugin tab on the toolbar. To double check the accessibility settings are enabled, click preferences.

Be sure the box titled Enable Accessibility and Reflow with tagged Adobe PDF is checked and click OK.
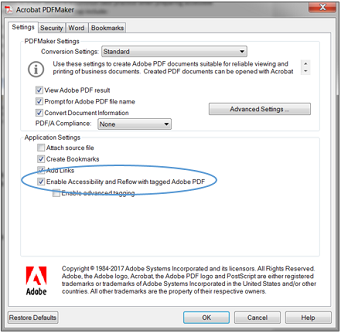
Click Create PDF on the Acrobat toolbar.

Be sure the save-as type is set to PDF and click Save.

Best Practices
- Create accessible documents during the design/creation process
- Use the Accessibility Checker to scan your documents
- Convert Word document to a PDF for mobility and accessibility
- Consider Readability for content development
Resources
Office Hours and Location
Mondays to Fridays: 8:00AM – 4:30PM
Saturdays to Sundays: Closed
Student Services Bldg.
4800, VPSS, Room 48322
Los Angeles Community College District Office
770 Wilshire Boulevard
Los Angeles, CA 90017
Contact
ADA Compliance
Rolf Schleicher, LAPC ADA Coordinator
Email: @email
Phone: (818) 710-4142
Acting District ADA Compliance Administrator
Brittany Grice, Administrator
Email: @email
Phone:(213) 891-2000
Title IX Coordinator
Jason Cifra, V.P. of Student Services
Phone: (818) 710-4228
Division of Student Services